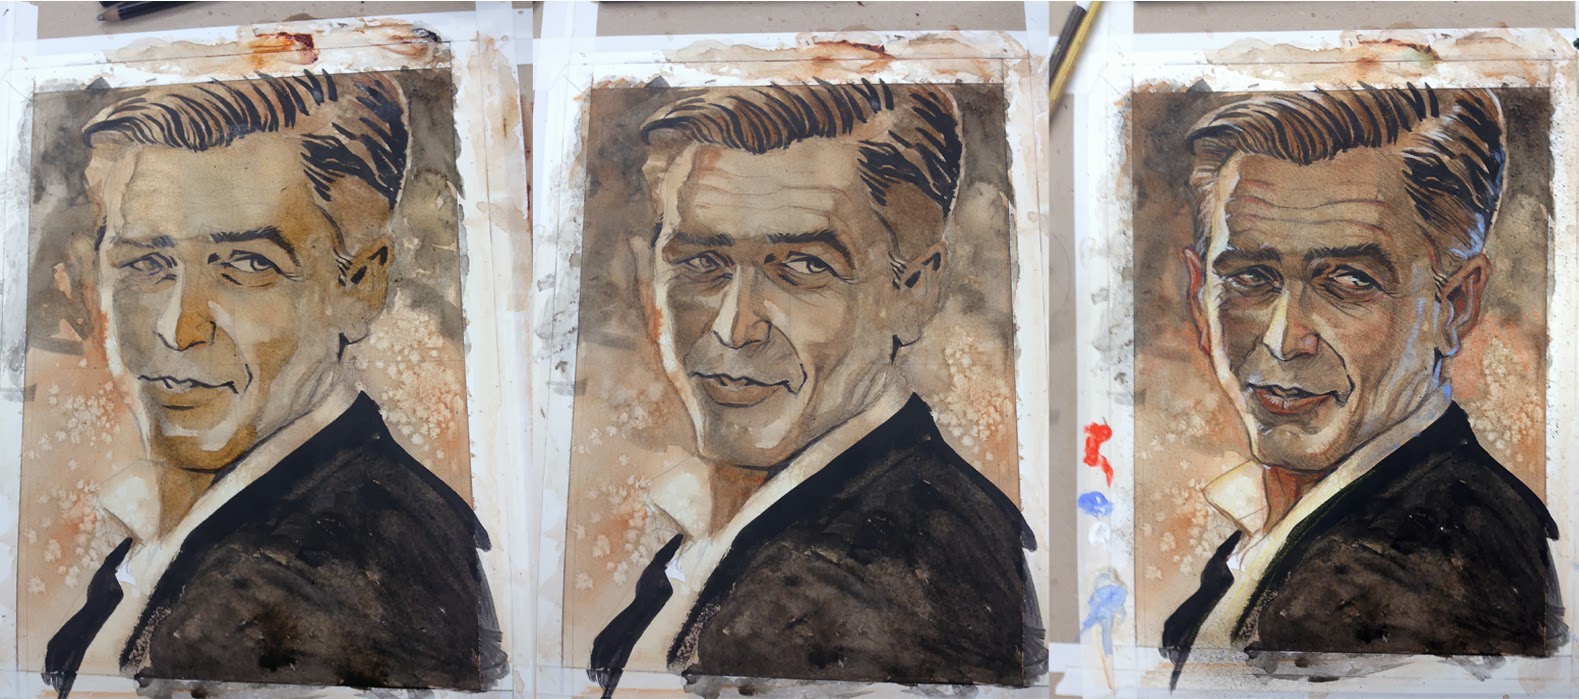
Image progress( approximating the Drew Struzan Technique)
This is a progress of pics I did as a demo for my students last week. We were exploring using multiple media types to create different effects. This piece is coffee, salt, burnt umber,burt sienna watercolor, burnt umber, Burnt sienna, white and black colored pencil, titan buff, light ultramarine and titanium white acrylic and black ink. Also, cad red light acrylic and red, orange, and yellow colored pencil for fun.
The theory is to use each media for what it's best at. This took an hour and a half from start to this level of finish.
The steps are as follows:
1. The light pencil drawing on hot press watercolor paper( little texture): using reference as a guide, using grid patterns or whatever is necessary to draw the portrait down on the paper.
2. tape the artwork down well to keep it from buckling
3. take coffee brewed twice( so it's nice and dark) and wash it over the paper. letting it pool in the slight buckling you will experience. push it around with your brush and add a little pigment( burnt umber or sepia watercolor...not ink) to add some texture pushing it around with your brush keeping it loose.
3.5. throw down some salt.( this will soak up water concentrating pigment making cool textures. You can repeat these first 3 steps several times to make more complex textures.
4. let it dry
4.5. wipe off salt
5. get black ink and flatly lay in black simple shapes( see first pic) around dark places like eyes, under nose, upper lip and below lower lip. in the hair for shine, and under the chin.
6. wash thin layers of burnt sienna and umber watercolor into shadow areas....keep it light and transparent.
7. after it dries. reinforce pencil lines from earlier drawing with black, burnt umber and sienna colored pencil making sure to allow them to transition from dark areas( black) to lighter areas(burnt sienna)
8. start toning with the umber pencil, keeping sure to use directional marking to follow form. Don't push hard, use the pencil to create tone not grinding into the surface. Use the burnt sienna to accent the tones in the lighter areas.
9. you can start putting reds in the "hot areas" of the face. eyes, nose, ears, cheeks lips. every other area can be left without this color
10. use titan buff and a little titanium white to add light areas of skin and highlights. usin these paints texturally, don't worry about blending. just hit hightlights and textures.
11. in the shadows to show volume of form, use a complementary color( in this case ultramarine blue mixed with a little raw umber( a greenish brown and titan buff. paint into the shadows where light would be reflecting back into the shadows.
Take the tape off...you are done!


Comments